Hi guys, Today we will show you Life is Strange Remastered Achievement Guide and In this Life is Strange Remastered Achievement Guide List you can get Get all of Life is Strange’s achievements in this comprehensive guide. It will show you how to find LIS Remastered Achievement and where to snap the photo and obtain all of them.
So come and take a look at this Life is Strange Remastered Achievement Guide All aka LIS Remastered Achievement List. Also, read here: Life is Strange Remastered Guide All Episodes 1-5
Life is Strange Remastered Achievement Guide 2022
Get all of Life is Strange’s achievements in this comprehensive guide. It will show you how to find the achievements and where to snap the photo. Obtain all of them.
Life is Strange Remastered Episode 1 Achievements List
Macro Eyes – Take optional photo #1 in Episode 1: Chrysalis
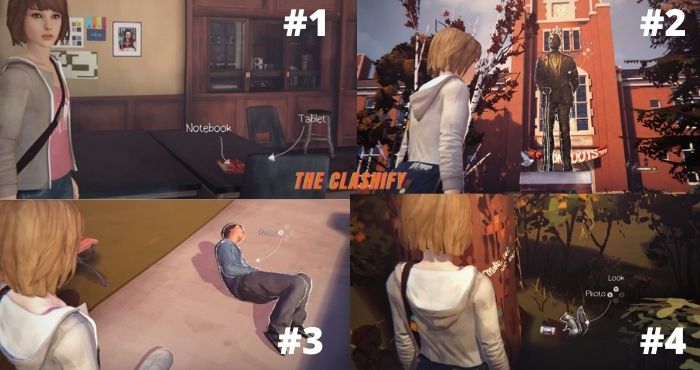
- Before you leave the classroom, take a photo of the graffiti that is on one of the tables in front of your desk.
Wide Angles – Take optional photo #2 in Episode 1: Chrysalis
- When Max is out on the quad after the fire alarm, view the statue of Jeremiah Blackwell and the option to take the statue’s photo comes up.
Telephotogenic – Take optional photo #3 in Episode 1: Chrysalis
- After Max goes outside after the fire alarm, one of the optional interactions she can have is with the skateboarders by the steps. If you can get Trevor to do the “tre flip,” he becomes the optional photo.
Close-Ups –Take optional photo #4 in Episode 1: Chrysalis
- This one is a photo of the squirrel under the tree near Kate and her bench at the dormitory sequence at the far end of the dorm lawn.⠀⠀⠀⠀⠀⠀⠀⠀⠀⠀⠀⠀⠀⠀⠀⠀⠀⠀⠀⠀⠀⠀⠀⠀⠀⠀⠀⠀⠀⠀⠀⠀⠀⠀⠀⠀⠀⠀⠀⠀⠀⠀⠀⠀⠀⠀⠀⠀⠀⠀⠀⠀⠀
Red Eye – Take optional photo #5 in Episode 1: Chrysalis
- When Max goes to her dorm room to retrieve the flash drive for Warren, there is an option to look in the mirror by the door. Look in the mirror, and take the photo (mirror selfie).⠀
Focused – Take optional photo #6 in Episode 1: Chrysalis
- When you go to Victoria’s room, there are a number of photos on her wall by the door. You get the option to rearrange them…creatively, and then to take the photo.
Zoomed In – Take optional photo #7 in Episode 1: Chrysalis
- • When you exit the dorm, you have to rewind after the football hits Alyssa. Warn her, and Zach will throw the football at a window instead. Look at and photograph the busted window.
Focal Pointed – Take optional photo #8 in Episode 1: Chrysalis
- When you get to the parking lot, head to the RV in the far corner. Write in the dirt on the window and then take the shot.⠀⠀⠀⠀⠀⠀⠀⠀⠀⠀⠀⠀⠀⠀⠀⠀⠀⠀⠀⠀⠀⠀⠀⠀⠀⠀⠀⠀⠀⠀⠀⠀⠀⠀⠀⠀⠀⠀⠀⠀⠀⠀⠀⠀⠀⠀⠀⠀⠀⠀
Maximum Aperture – Take optional photo #9 in Episode 1: Chrysalis
- When Max and Chloe leave Chloe’s room and end up at the lighthouse, there is a bird sitting on a rock in the middle of the downward path. Take the bird’s picture.⠀⠀⠀⠀⠀⠀⠀⠀⠀⠀⠀⠀⠀⠀⠀⠀⠀⠀⠀⠀⠀⠀⠀⠀⠀⠀⠀⠀⠀⠀⠀⠀⠀⠀⠀⠀⠀⠀⠀⠀⠀⠀⠀⠀⠀⠀⠀⠀⠀⠀
Light Leak – Take optional photo #10 in Episode 1: Chrysalis
- When you go up the hill to meet Chloe at the lighthouse, take a photo of the back of her head, framed in the sunlight, before you talk to her.
Visionary – Take all optional photos in Episode 1: Chrysalis
- The achievement seems self-explanatory, but it’s worth noting here that if you miss any of the photos, you can still get them by replaying segments of the episodes, an option at the main menu, in “collectible mode.” You also have the option to replay the story from whatever point you choose to pick up the photos and redo your choices.⠀⠀⠀⠀⠀⠀⠀⠀⠀⠀⠀⠀⠀⠀⠀⠀⠀⠀⠀⠀⠀⠀⠀⠀⠀⠀⠀⠀⠀⠀⠀⠀⠀
Chrysalis – Finish Episode 1: Chrysalis
- Simply play through the first episode to unlock this achievement.
Also, read here: Life is Strange Remastered Guide All Episodes 1-5⠀⠀⠀⠀⠀⠀⠀⠀
Life is Strange Remastered Episode 2 Achievements List
Field Of View – Take optional photo #1 in Episode 2: Out of Time
- Shortly after you start this episode you will have to return a borrowed book to Kate. Once you have made it to her room, to your left, you should see a rabbit cage with a rabbit in it. Walk up to the cage and you will be prompted to take a photo. After you have taken the photo the achievement will unlock.
Full Exposure – Take optional photo #2 in Episode 2: Out of Time
- Shortly after you have returned Kate her book you will have to exit the girls dorm. Once you have left the dorms, head right and make your way to the trash can that is next to a bench. Max will take a piece of bread out of the trash can and put it on the bench. After you have done that, walk way from the bench and wait for the squirrel to get on it and start eating the bread. Once the squirrel has gotten on the bench walk up to it and you will be prompted to take a photo. After you have taken the photo the achievement will unlock.
Processor – Take optional photo #3 in Episode 2: Out of Time
- Later on in this episode, you will have to take the bus to the Two Whales diner. Once you have arrived at the diner, walk toward the door, and look up at the sign on the room. Once you look at the sign you will be prompted to take a photo. After you have taken the photo the achievement will unlock.⠀⠀⠀⠀⠀⠀⠀⠀⠀⠀⠀
Image Stabilizer – Take optional photo #4 in Episode 2: Out of Time
- •Right after you have taken photo #3 and have unlocked the achievement Processor, walk around to the right side of the diner, and turn left past the homeless person. Once you have done that you should have made it to a fence, and you should see an RV with a guy and a dog sitting outside of it. Look at the dog and you will be prompted to take a photo. Once you have done so the achievement will unlock.
Compressed – Take optional photo #5 in Episode 2: Out of Time
- •After taking optional photo #4 you will now want to make your way into the diner. Once you have made it into the diner, turn left and make your way to the bathrooms. When you have made it into the bathroom, look at the mirror above the sink and you will see writing that says “Fire Walk With Me” carved into it. Look at the writing and you will be prompted to take a photo. After you have taken the photo the achievement will unlock.
Pixelated – Take optional photo #6 in Episode 2: Out of Time
- Later on in the story, Chloe will take you to a junkyard. Once you have made it to the junkyard and she asks you to go find 5 bottles for her, turn around and walk up to the yellow bus. Once you do, stand near the pile of tires and look at bus, when you do, you will be prompted to take a photo. After you have taken the photo the achievement will unlock.
Dynamic Range – Take optional photo #7 in Episode 2: Out of Time
- Once in the junkyard make your way to the field behind the yellow school bus. You will spot a deer. Follow it and you will be prompted to take a photo. Do this and the achievement will pop.
Colorized – Take optional photo #8 in Episode 2: Out of Time
- After helping Chloe take out the bottles you collected; There is an opportunity to take a picture of her while she’s lying down on the front of the car.
Meter Made – Take optional photo #9 in Episode 2: Out of Time
- Once you are back at school make your way to the science lab. Speak to Warren and he will ask you what chemical he should add to his experiment. It doesn’t matter what answer you give. After that head up the front of the classroom and talk to Ms. Grant. She will give you the correct answer then simply go back and tell Grant. He will complete the experiment and you can take his photo for the achievement.
Resolution Revolution – Take optional photo #10 in Episode 2: Out of Time
- Once you reach the photography class, take a photo of Alyssa standing under the window.
Lab Master – Take all optional photos in Episode 2: Out of Time
- You will get the achievement after taking all 10 photos from the second episode described above.
Out of Time – Finish Episode 2: Out of Time
- You will unlock the achievement after completing the second episode of the game.⠀⠀⠀⠀⠀⠀⠀⠀⠀⠀⠀
Life is Strange Remastered Episode 3 Achievements List
Parallax View – Take optional photo #1 in Episode 3: Chaos Theory
- After speaking with Taylor in the bathroom and confirming that Victoria has left, go into Victoria’s room and let your camera light charge up the glow-in-the-dark figure on her shelf. After a few seconds you’ll be able to take a picture of it.⠀⠀⠀⠀⠀⠀⠀⠀⠀⠀⠀⠀⠀⠀⠀⠀⠀⠀⠀⠀⠀⠀⠀⠀⠀⠀⠀⠀⠀⠀⠀⠀⠀⠀⠀⠀⠀⠀⠀⠀⠀⠀⠀⠀⠀⠀⠀⠀⠀⠀
Lenscrafted – Take optional photo #2 in Episode 3: Chaos Theory
- After exiting the dorms, turn right and walk toward the squirrel on the bench. It will run away, but after a quick rewind, you’ll be able to snap the photo.
The Reflex – Take optional photo #3 in Episode 3: Chaos Theory
- In the biology classroom near the windows is a small fish tank. Inspect it, then turn on the light to take the picture.
Histogrammar – Take optional photo #4 in Episode 3: Chaos Theory
- Also inside the biology room, take a picture of the skeleton near the back door.
Bokeh – Take optional photo #5 in Episode 3: Chaos Theory
- Inside the principal’s office, you’ll need the perfect angle for this one to get the bronze hawk lined up to take a picture of Chloe.
Pinholed – Take optional photo #6 in Episode 3: Chaos Theory
- After getting dressed in Rachel’s clothes, leave the bedroom and take a selfie in the bathroom mirror.
RAW Strength – Take optional photo #7 in Episode 3: Chaos Theory
- After helping Chloe’s mom make breakfast, but before sitting down to eat it, open the window right next to the table, then find a bird sitting on top of a cabinet next to the door to the garage. Scare it once so it moves to the fireplace, then again so it flies out the window. Exit through the sliding door to the backyard and snap a photo of it on the fence.⠀
Viewfinder – Take optional photo #8 in Episode 3: Chaos Theory
- Before you can take a picture of this truck, you’ll have to speak with the owner outside the diner. Once he tells you the exact make and model of the truck, rewind and speak to him again using that as a key phrase. He’ll be impressed and allow you to photograph it.
Optican – Take optional photo #9 in Episode 3: Chaos Theory
- Directly after taking the last picture, go to the right side of the diner and take a picture of the bird on the ground with a swarm of ants around it.
Flash – Take optional photo #10 in Episode 3: Chaos Theory
- After you use your new power, you’ll be in the kitchen with Chloe and her dad. Pick up the camera next to them at the sink to snap the final photo.
Camera Eye – Take all optional photos in Episode 3: Chaos Theory
- After taking all ten photos you will receive this achievement as well. If you miss any pictures during the story, you can load various areas in “collectible mode” and get them this way without affecting any of your story choices or having to start a new playthrough. You can check your progress at any time by hitting the Back button and going to the third tab. The pictures there in black and white show hints of what to look out for in finding the other photo ops.
Chaos Theory – Finish Episode 3: Chaos Theory
- You will unlock the achievement after completing the third episode of the game.
Life is Strange Remastered Episode 4 Achievements List
Ambient – Take optional photo #1 in Episode 4: Dark Room
- When you finally gain control of Max with her camera, immediately take a picture of Chloe sitting at the desk.
Time-Lapsed – Take optional photo #2 in Episode 4: Dark Room
- In the garage, to the right of the lockers, move the plank and take a picture of the Blue Jay nest. You can choose to move the plank back or not.
Balance – Take optional photo #3 in Episode 4: Dark Room
- At the Blackwell campus, there is a cairn (pile of rocks) in the corner of the yard near the totem pole.
Rangefinder – Take optional photo #4 in Episode 4: Dark Room
- In the same courtyard as the previous photo, speak with Samuel about “animals” and he will feed the squirrels. Only one will emerge though, until you use the food to lure the second one. Grab the photo when both are eating next to each other.
Gamma Value – Take optional photo #5 in Episode 4: Dark Room
- Inside the boy’s dorm, look out the window in the hallway to the right and take a photo of the footsteps.
Dioptric Power – Take optional photo #6 in Episode 4: Dark Room
- At the beach, take a picture of the third dead whale.⠀⠀⠀⠀⠀⠀⠀⠀⠀⠀⠀⠀⠀⠀⠀⠀⠀⠀⠀⠀⠀⠀⠀⠀⠀⠀⠀⠀⠀⠀⠀⠀⠀
Fisheye – Take optional photo #7 in Episode 4: Dark Room
- To the left of the barn, you’ll have to quickly snap this photo of the bird on the fence before it flies away. Rewind if you miss it.
Manually Exposed – Take optional photo #8 in Episode 4: Dark Room
- Inside the barn, after Max steps onto the second platform, take a photo of the owl hiding under the roof of the building.
Slideshow – Take optional photo #9 in Episode 4: Dark Room
- Inside the bathroom (next to the VIP booth), take a picture of Justin lined up with the skeleton graffiti on the half-wall.
Tripod – Take optional photo #10 in Episode 4: Dark Room
- Still inside the party/pool area, you need to line up the windows on the right side so you can view the double moon outside. You could actually take this before #9, as soon as you enter the pool area.
Shutterbug – Take all optional photos in Episode 4: Dark Room
- After taking all ten photos you will receive this achievement as well. If you miss any pictures during the story, you can load various areas in “collectible mode” and get them this way without affecting any of your story choices or having to start a new playthrough. You can check your progress at any time by hitting the and going to the third tab. The pictures in black and white show hints of what to look out for in finding the photo ops during the episode.
Dark Room – Finish Episode 4: Dark Room
- You will unlock the achievement after completing the fourth episode of the game.
Life is Strange Remastered Episode 5 Achievements List
Incandescent – Take optional photo #1 in Episode 5: Polarized
- After arriving back where it all started and obtaining control of Max, walk to Kate and “Comfort” her. Afterward, you’ll be able to snap her photo.
Incandescent – Take optional photo #2 in Episode 5: Polarized
- •When you get control of Max in the art gallery, head to the right and downstairs into a small alcove. Pick up the camera there and take a picture of the girl on the bench.
Framed – Take optional photo #3 in Episode 5: Polarized
- After being transported back to the Dark Room, you’ll be required to rewind after someone shows up. You’ll then ask Mr. Jefferson for a last request; choose one last picture.
Camera Obscura – Take optional photo #4 in Episode 5: Polarized
- After you stop the diner from exploding, you’ll gain control outside. Simply turn around and snap a photo of the whale on the road behind you.⠀⠀
Blowup – Take optional photo #5 in Episode 5: Polarized
- Directly after the last photo, turn around and walk toward the building next to the diner with the car on the roof. Get the right angle (just to the left of it) for the photo op to become active.
Iris – Take optional photo #6 in Episode 5: Polarized
- After arriving in the classroom yet again, inspect the etchings on the desk in front of you (might have to do so twice), and then take a photo of it.
Sensor – Take optional photo #7 in Episode 5: Polarized
- You’ll next transport to the dorm hallway, and have to enter certain doors to progress. After entering Victoria’s room (as Victoria), you’ll become Max again. Head to the off-shoot to the right and take a video of the giant squirrels outside the window.
On Display – Take optional photo #8 in Episode 5: Polarized
- Now you’ll be in school, but the entire scene is playing out backward around you. Walk down the hallway and turn right to find the skeleton in the corner. Instead of the usual prompt to take a photo, the journal prompt will show up in the bottom corner of the screen as if you have already taken it. Press to reverse the process and get credit for the achievement.
Light Meter – Take optional photo #9 in Episode 5: Polarized
- The next section is a stealth puzzle. In the third section you’ll be sneaking past Warren through some lockers. You’ll go left around the first set of lockers, then need to turn right at the next set. Samuel will go by, and after two more quick rights, you’ll find Warren’s locker. Open it and take a photo of what’s inside.
Silhouettes – Take optional photo #10 in Episode 5: Polarized
- At the very next sneaking section, you’ll need to find five bottles in the junkyard. After finding all five, they will be sitting on a desk near the end. Snap the photo of all the bottles lined up.
⠀⠀⠀⠀⠀⠀⠀⠀⠀⠀⠀⠀⠀⠀⠀⠀⠀⠀⠀⠀⠀⠀⠀⠀⠀⠀⠀⠀⠀⠀⠀⠀⠀⠀⠀⠀⠀⠀⠀⠀⠀⠀⠀⠀⠀⠀⠀⠀⠀⠀⠀⠀⠀
Selfie Awareness – Take all optional photos in Episode 5: Polarized
- After taking all ten photos you will receive this achievement as well. If you miss any pictures during the story, you can load various areas in “collectible mode” and get them this way without affecting any of your story choices or having to start a new play through. You can check your progress at any time by pressing and going to the third tab. The pictures in black and white show hints of what to look out for in finding the photo ops during the episode.
Polarized – Finish Episode 5: Polarized
- You will unlock the achievement after completing the fifth episode of the game.⠀
So guys, That it for this Life is Strange Remastered Achievement Guide 2022 aka LIS Remastered Achievement Guide 2022
ncG1vNJzZmismJqwra3SoaCfsV6YvK57y6KdnmWZqHq0wNGapaCdXaeyrq3SrZyrnZRirqS0yJ6tnqWVo8Fus9Sim55n